


Cloneable tags
Description
The Load Third Party Forms via JS technique allows you to load forms or other elements from a different page on your Webflow site. This technique can be useful for embedding third-party forms in Webflow or for using external action URLs. It can also help to combat spam bots, as many of these bots do not utilize or render JavaScript. In order to use this technique, you will need to ensure that JavaScript is enabled in the browser. Muhammad Ukasha has created a Webflow cloneable that demonstrates this technique and has categorized it under the categories of Form and Embed. By using the Load Third Party Forms via JS technique, you can easily embed forms or other elements from external sources into your Webflow projects.
Related cloneables


A fun login and sign up page for Webflow featuring a unique cartoon character that follows your mouse cursor. This is accomplished via 100% native Webflow interactions. The SVG was broken up into several parts, and added a hover over element interaction to the background and hover/in out interactions to the email, password and login fields. The rotating head effect is created by moving close-up elements slightly more than the background elements. For example, the nose moves 11px to the left or right, while the mouth only moves 9px and the face moves 6px while the body doesn't move at all.
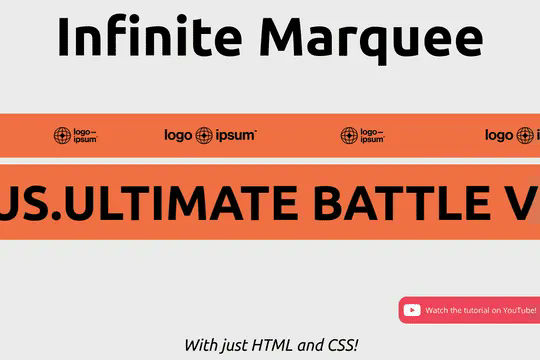

Add an infinite horizontal marquee to your Webflow site using only HTML & CSS. Building infinite marquees with Webflow interactions can be difficult and confusing. This solution allows you to easily add a horizontal marquee to your Webflow site using HTML embeds or Webflow's custom code. The infinite marquee is lightweight and allows you to customize the direction, as well as the speed at which the marquee is displayed on your site. Skip the confusing calculations typically required for native Webflow interactions and add an infinite Webflow horizontal marquee to your site in seconds.


Pop up contact form modal interaction for Webflow. A clean modal window appears with a contact form when clicking on the contact button. This contact modal form features all the native Webflow interactions required for a modal window in a fully responsive design.


This is the official starter UI kit for the Untitled UI Webflow components library driven by Relume. This project contains a styleguide with all of the necessary pre-built classes. There are no pages, no layouts and nothing that you need to delete. This Untitled UI kit uses the client-first Webflow styling system. The styleguide features all typography, H1 headings, H2 headings all the way through H6 headings. This also includes the heading classes from xxlarge to xsmall, paragraphs, links, block quotes, unordered and ordered lists. You'll find the class text sizes such as text size large, text weights, text heights, text styles, color swatches, including error, warning and success color states. Background colors, text colors, shadows, UI buttons and all necessary elements, badges, badge groups, form elements such as inputs, dropdowns, checkboxs and radios. This is the complete Untitled UI styleguide kit to jump start your next Webflow builds.


Here's a way to create a multi-step Webflow form that includes a step counter, custom confirmation animations and custom checkboxes. A perfect way to filter leads, create long forms that are filled out, and segment your lists/clients.


A way to add a dropdown with all the countries and flags to your Webflow site. There are several examples that utilize Nice Select, including flags, no flags and a dropdown only. You can copy-paste the custom code element with a select tag with all the countries in it. Note that this is achieved via JS and you won't be able to preview this within the WEbflow designer.
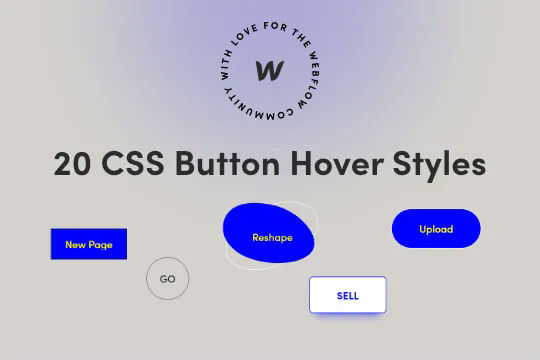

Twenty prebuilt CSS button hover effects to allow you to easily add button hover effects without complicated Webflow interactions. These include a number of unique effects such as marquee text on hover, fade in and fade out, 3D expanding effects, chat widget buttons, rotating and much more. You can add these to your Webflow site by copying the HTML embed with the relevant CSS scripts for the button effects that you want. Add the custom css class to your buttons and you'll immediately be able to view the button effects within Webflow designer. This makes for easy, and lightweight buttons that provide fun effects without the headache of interactions or complicated hover states.


Here's a way to add TikTok videos in a slider with Finsweet client first naming conventions driven by Webflow native CMS. Adding videos could be automated with Make/Integromat or Zapier with the creation of new items in the slider from this collection. This uses the CMS to drive the videos and uses Client-first CSS classes.

More from author
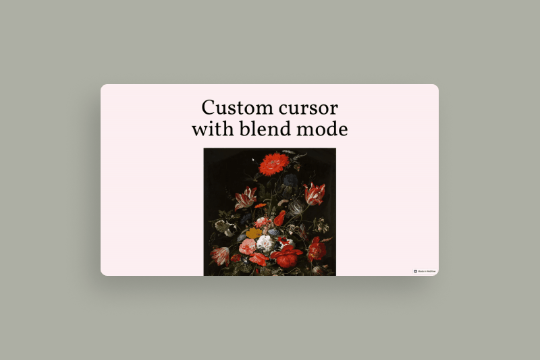
A fun example of the blending feature released by Webflow via a custom mouse cursor. This technique turns the mouse cursor into a blended object, when hovering over the image you can see the blending difference effects. This utilizes some minor custom CSS for the mouse cursor although the true blending and custom cursor is created via native Webflow interactions and features.

Prevent Webflow form spam with this unique form validation technique. Using this you'll be able to block spam emails from generic or invalid email addresses from sending you form spam before they get validated with Webflow's native forms. In order to get this to work you'll need to utilize the code found within the closing body tag of the Page Settings. You can customize the invalid domain names within the settings to prevent any domains that you don't want to have form submissions from.

Here's a way of using a math problem for a captcha in your Webflow forms. This allows users to create a basic math problem prior to them being able to successfully submit their form submission. All math questions are randomly generated.

Load form or anything from a different page on your Webflow site. This is helpful for embedding 3rd party forms in Webflow or even external action URLS. This helps combat most spam bots since many don't utilize or render JS. Keep in mind that JS needs to be enabled in the browser for this technique to work.